Description
Wyin Aqua Dual Gauge Smart CO₂ Modular Regulator
The Wyin Aqua Dual Gauge Smart CO₂ Modular Regulator is a precision-engineered, modular system designed to deliver controlled and consistent CO₂ injection for planted aquariums. This single-stage regulator it is compatible with standard CO₂ cylinders (e.g., W21.8, CGA320, G5/8 threads) and supports multiple aquariums through its expandable manifold design. The regulator features dual pressure gauges, a programmable timer, and an integrated solenoid valve for automated CO₂ delivery, making it ideal for hobbyists seeking reliable and flexible CO₂ management for aquatic plant growth.
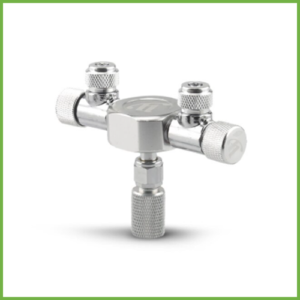
Below is an example of the modular manifold with 2 adjustable outlets

Example of a manifold

Benefits:
- Stable CO2 Delivery: Dual-stage design ensures consistent CO2 output, preventing dangerous EOTD that could suffocate fish or plants.
- Versatile for Multiple Tanks: Expandable manifold system allows precise CO2 injection to multiple aquariums from a single regulator, each with independent control.
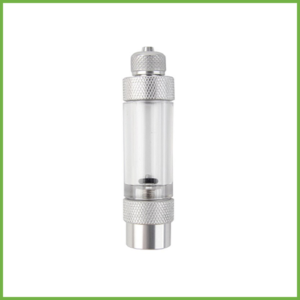
- Precise Dosing: High-precision needle valve enables fine-tuned CO2 dosing as low as 1 bubble per 10 seconds, suitable for nano tanks to large setups.
- Automation: The included digital timer and solenoid valve allow CO₂ injection to sync with lighting cycles, optimizing plant photosynthesis and reducing waste
- Enhanced Plant Growth: Maintains optimal CO2 levels, promoting lush plant growth and vibrant aquascapes.
- Safety and Reliability: Built with high-quality materials (stainless steel and aluminum alloy) and includes a 12V DC solenoid for automated, safe operation.
- User-Friendly: Comes with a clear quick-start guide and a comprehensive 45-page e-book for easy setup and CO2 optimization
Features:
- Integrated 12V DC Solenoid Valve: Enables manual or automated CO₂ control via the included programmable digital timer.
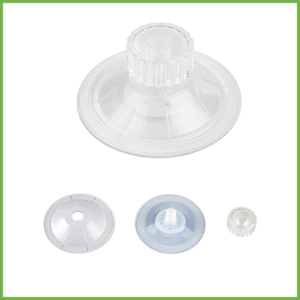
- Expandable Manifold: Allows connection of multiple needle valves (up to five) for independent CO2 control in multiple tanks. Each manmifold includes a bubble counter for precise dosing.
- High-Precision Needle Valve: Enables accurate CO2 flow adjustment, down to 1 bubble per 10 seconds, ideal for fine-tuning.
- Dual Gauges: Displays cylinder pressure (0–3000 PSI) and output pressure (0–140 PSI) for easy monitoring.
- Integrated Check Valve: Prevents water backflow into the regulator, enhancing durability.
- High-Quality Materials: Constructed from aluminum alloy and brass for corrosion resistance and durability.
- Compatibility: Designed for AU/NZ CO2 cylinders with W21.8-14 European Standard threads; compatible with standard 4/6 mm CO2-proof tubing
How to Use:
1. Preparation
- Ensure you have a compatible CO₂ cylinder (e.g., W21.8, CGA320, or G5/8 thread).
- Gather CO₂ pressure-rated tubing (4/6mm), a bubble counter, and a diffuser or atomizer.
- Check that all components (regulator, solenoid, bubble counter) are intact and free of defects.
2. Installation
Safety Note: Ensure the CO2 cylinder is turned off before starting. Work in a well-ventilated area, and keep the system away from heat sources or direct sunlight.
Attach Regulator to CO2 Cylinder:
- Inspect the regulator and cylinder valve for damage or debris. Ensure the O-ring on the regulator’s cylinder connection is intact.
- Securely screw the regulator onto the CO2 cylinder’s valve (W21.8 threads) by hand, then tighten gently with a wrench if needed. Do not overtighten.
Optional Manifold Extension:
- If supplying multiple tanks, attach Manifold Extensions to the regulator’s output.
- Follow the manifold’s instructions to connect additional tubing and diffusers for each tank
Connect Tubing and Accessories:
- Attach CO2-resistant tubing (4/6 mm) to the manifold’s output port.
- Connect the other end of the tubing to a bubble counter, check valve.
- CO2 diffuser installed in the aquarium.
- Ensure all connections are secure to prevent leaks.
Connect to Solenoid: Plug the solenoid it into the provided timer and synced with your aquarium lighting (e.g., start CO2 2–3 hours before lights turn on and stop when lights turn off). This conserves CO2 and aligns with plant photosynthesis cycles.
3. Setup and Calibration
Turn On the CO2 Cylinder: Slowly open the cylinder valve (counterclockwise) to pressurize the system. The high-pressure gauge will show the cylinder’s remaining pressure.
Set Working Pressure: Adjust the regulator’s main valve to set the working pressure to 25–40 PSI, suitable for most diffusers. Check the low-pressure gauge (0–150 PSI) to confirm.
Adjust CO2 Flow:
- Open the high-precision needle valve slowly to start CO2 flow. Aim for an initial rate of 1 bubble per second per 50 liters of tank water, visible in the bubble counter.
- For high CO2 saturation (e.g., high-tech planted tanks), increase to 4–5 bubbles per second, but adjust gradually while monitoring.
Check for Leaks: Apply soapy water to all connections (regulator-to-cylinder, tubing, etc.) and look for bubbles. Tighten connections if leaks are detected.
Fine-Tune for Each Tank: If using manifold extensions, adjust each manifold’s needle valve independently to set the appropriate bubble rate for each aquarium.
4. Monitor CO2 Levels
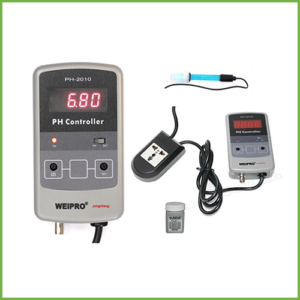
- pH Drop Method: Use a pH/KH test kit to measure CO2 levels. Aim for a 1-point pH drop from when CO2 is off to peak saturation (typically 25–35 ppm CO2 for plant growth). Adjust the needle valve gradually, as there may be a lag in CO2 saturation.
- Observe Livestock: Monitor fish and invertebrates for signs of stress (e.g., gasping at the surface), indicating excessive CO2. Reduce the bubble rate if needed. Introduce animals when CO2 is off (e.g., after a water change) to allow gradual adjustment.
- Drop Checker (Optional): If using a drop checker, place it in the tank away from the diffuser. A green color indicates optimal CO2 (25–35 ppm); adjust the needle valve if it’s blue (too low) or yellow (too high).
5. Maintenance
- Regular Checks: Inspect the bubble counter, check valve, and tubing for blockages or wear. Clean with a damp cloth and avoid using solvents.
- Cylinder Refills: Monitor the inlet pressure gauge to estimate when the CO2 cylinder needs refilling (typically every 3–4 months for a 3kg cylinder on a 160 litre tank).
- Solenoid Operation: If using a solenoid, ensure it shuts off CO2 when not needed to prevent overuse and maintain safety.
- Dust Prevention: Cover the regulator when not in use to avoid dust buildup, and clean with a blower if necessary.
Tips for Success
- Start Low: Begin with a low CO2 injection rate and gradually increase while monitoring pH and livestock to avoid overdosing.
- Sync with Lighting: CO2 is only needed during photosynthesis (when lights are on). Use a solenoid timer to automate injection for efficiency.shop.
- Compatibility Caution: While manifold blocks from different brands may look similar, compatibility with the regulator is not guaranteed. Stick to Wyin Aqua manifold extensions for reliability.
- Plant Growth: Expect faster, healthier plant growth with vibrant coloration, as demonstrated in experiments where CO2-injected tanks showed superior growth compared to non-CO2 tanks.
Warnings
- Indoor Use Only: The system is designed for indoor use to avoid temperature extremes or condensation issues.
- Livestock Safety: Over-injection of CO2 can lower pH and harm fish. Always monitor and adjust gradually.
- Professional Installation: Some steps (e.g., manifold attachment) may require care to avoid damaging O-rings or joints. If unsure, consult a professional or the manufacturer’s service team.
Specifications:
- Material: Aluminum alloy (body), brass (needle valve and fittings), stainless steel (check valve).
- Pressure Gauges: Dual gauges (cylinder pressure: 0–3500 psi; working pressure: 0–150 psi or 0–10 bar).
- Solenoid Voltage: Input AC100–240V, Output DC12V, Power 3W.
- Inlet Thread: Compatible with W21.8, G5/8, CGA320, M22.
- Outlet Thread: M10×1.
- Tubing Compatibility: 4/6mm CO₂ pressure-rated tubing.
- Inlet Pressure: Max 15 MPa (~2175 psi).
- Outlet Pressure: 0.3–0.4 MPa (~43–58 psi).
- Manifold: Single output included, expandable with additional manifolds (sold separately).
- Dimensions: Compact design, approximately 4–6 inches in height (regulator body).